How is this possible? I blinked and suddenly I have a two year old!
You are so sweet, incredibly shy, such a cuddly kid. You love watching anything with wheels (street sweepers, dump trucks, semis, tractors, trains). You wake up with Daddy at 5am every day. You love to run and read books over and over. You are an adoring big brother and very gentle with your little sister. You have this goofy look when you are asking a silly question and pretending to think of an answer; your eyes look so far over to one side and you say "hmmm" and it gets us laughing every time. In short, we love everything about you, birthday boy!
Saturday, July 23, 2016
Saturday, March 19, 2016
Baby 2 Prep, Three Projects
Today is my due date! Since my son was a week overdue, I've been trying to keep in mind that I will be "overdue" this time as well. Nothing says fun like people asking you "when are you due?" and having to answer "last week".
I've pretty much checked off as much as possible from my list of "to do's" so it's just been a waiting game for a couple of weeks now. I even had my whole house clean at the same time...once. Then I didn't give birth and now it's messy again. Funny how that works.
Here's a few of my projects that I've done recently. I could probably make separate posts for each one but...I'm 40 weeks pregnant and I make the rules here.
The first is a wall hanging that I made. I know this isn't everyone's cup of tea, mostly because my hubby thinks I'm crazy for wanting this on my wall. But he let me do it anyway. Thanks, honey!
I had been saving a branch from our backyard to make one of these jewelry/scarf hangers. That's right, I was saving a special stick since last summer. Thanks, again, honey! I changed direction and decided I wanted to paint it with some stripes and hang pom poms from it, like this. I used a variety of leftover bits of yarn to make different size pom poms. By the way, have you seen this genius way to make a bunch of pom poms simultaneously???? I didn't do it that way but it would have been smart! I used clear thread to hang the pom poms from the branch, after painting stripes on the branch with leftover bits of paint. TADA! And if you call it a "wall hanging", it's trendy and cool and not "junk I decided to hang on my wall". This is being hung above the baby's crib in our bedroom.
The next thing that I made was for my son's 2nd birthday in about a month--an apron for cooking! This kid loves to help in the kitchen and insists that I wear my apron when I'm in there. So I thought he might enjoy one his size.
I used this pattern and found a cute fat quarter at Joanne's to use. Don't be like me though. I didn't realize that the cars were running the wrong direction (vertically) for the pattern because of how the fat quarter had been cut (they were "driving" along the long side rather than across the shorter side). So this apron is a bit shorter than the pattern called for. Oh well. I haven't given it to him yet, so I have no pictures of him wearing it yet.
It's an easy peasy pattern (made a million times easier because I finally got to use my new-to-me hand-me-down Janome machine!!!! Thanks, Grandma!) so that means that every toddler I know will be getting one for a gift at some point.
Finally, I whipped up this little project today while my son used play doh. I've been collecting (read: hoarding) independent toddler activities for awhile so that he can play with special "big boy" toys while I nurse the baby. I think I'm over compensating for feeling like he'll be deserted while the baby gets all the attention. I saw this brilliant idea for a fabric "road" that can be laid on the floor and whipped a bunch of pieces out in about 10 minutes today.
I used an old pair of jeans that I've been saving (maybe I really am a hoarder??) and cut it up into road shapes. Nothing fancy here, just roughly the same width at each end so that the road can be continuous. Then I used some blue craft paint (because that's what I found. Again, 10 minute project) and made center lines along each piece. Once they dry, I'll throw them into his special "big boy basket" with some wooden cars from the dollar spot at Target and he can choose to play with this, or several other items, while the baby is needing attention.
There you have it. Three projects done! One very pregnant lady, still pregnant.
I've pretty much checked off as much as possible from my list of "to do's" so it's just been a waiting game for a couple of weeks now. I even had my whole house clean at the same time...once. Then I didn't give birth and now it's messy again. Funny how that works.
Here's a few of my projects that I've done recently. I could probably make separate posts for each one but...I'm 40 weeks pregnant and I make the rules here.
The first is a wall hanging that I made. I know this isn't everyone's cup of tea, mostly because my hubby thinks I'm crazy for wanting this on my wall. But he let me do it anyway. Thanks, honey!
![]() |
| Pretty hard to see clear thread, but just make sure that your thread goes through the piece of yarn tying the pom pom together. Otherwise, tragedy. |
I had been saving a branch from our backyard to make one of these jewelry/scarf hangers. That's right, I was saving a special stick since last summer. Thanks, again, honey! I changed direction and decided I wanted to paint it with some stripes and hang pom poms from it, like this. I used a variety of leftover bits of yarn to make different size pom poms. By the way, have you seen this genius way to make a bunch of pom poms simultaneously???? I didn't do it that way but it would have been smart! I used clear thread to hang the pom poms from the branch, after painting stripes on the branch with leftover bits of paint. TADA! And if you call it a "wall hanging", it's trendy and cool and not "junk I decided to hang on my wall". This is being hung above the baby's crib in our bedroom.
The next thing that I made was for my son's 2nd birthday in about a month--an apron for cooking! This kid loves to help in the kitchen and insists that I wear my apron when I'm in there. So I thought he might enjoy one his size.
![]() |
| Proof that he likes to help. This "Big Joe" apron is crazy huge on him though. |
I used this pattern and found a cute fat quarter at Joanne's to use. Don't be like me though. I didn't realize that the cars were running the wrong direction (vertically) for the pattern because of how the fat quarter had been cut (they were "driving" along the long side rather than across the shorter side). So this apron is a bit shorter than the pattern called for. Oh well. I haven't given it to him yet, so I have no pictures of him wearing it yet.
It's an easy peasy pattern (made a million times easier because I finally got to use my new-to-me hand-me-down Janome machine!!!! Thanks, Grandma!) so that means that every toddler I know will be getting one for a gift at some point.
Finally, I whipped up this little project today while my son used play doh. I've been collecting (read: hoarding) independent toddler activities for awhile so that he can play with special "big boy" toys while I nurse the baby. I think I'm over compensating for feeling like he'll be deserted while the baby gets all the attention. I saw this brilliant idea for a fabric "road" that can be laid on the floor and whipped a bunch of pieces out in about 10 minutes today.
I used an old pair of jeans that I've been saving (maybe I really am a hoarder??) and cut it up into road shapes. Nothing fancy here, just roughly the same width at each end so that the road can be continuous. Then I used some blue craft paint (because that's what I found. Again, 10 minute project) and made center lines along each piece. Once they dry, I'll throw them into his special "big boy basket" with some wooden cars from the dollar spot at Target and he can choose to play with this, or several other items, while the baby is needing attention.
There you have it. Three projects done! One very pregnant lady, still pregnant.
Thursday, February 18, 2016
Baby #2 Prep: Knitting projects
I've been knitting up a storm over here. It all started when I needed to make my son this hat and I rediscovered half of this sweater (Norwegian Baby) sitting on my needles. After I completed the hat I continued on (mostly) where I had left off and finished it up. It turned out incredibly cute and I am so proud!
I was able to use some of my Grandma & Great-Grandma's buttons to finish it and I love how it turned out! Sorry, kid #1, your mom put off knitting for so long you'll never be able to wear this.
I still hadn't scratched the knitting itch completely, so I whipped up a hat (Little Fair Isle Hat) for my sister's baby. Then I whipped up an identical hat for my baby. I am in love with the little loop at the top and think all my hats for kids will end up with a loop instead of a pompom for awhile.
After that, I knocked out a quick pair of baby socks following this pattern, Garter Stripe Baby Socks.
Now the knitting itch has been satisfied and I can work on some other projects for awhile.
It's a good thing, too, as I'm officially 9 months pregnant and have quite a to-do list before this second kiddo is born. Namely:
-get out and wash newborn attire and diapers
-pick out an announcement
-install the carseat
-preregister at the hospital
-print birth plan
-practice hypnobirthing
-make kid#1 busy bags
-make a million freezer meals
-stockpile necessities (food, toiletries, paper products)
-buy a few things (like a double stroller and new diaper covers)
-plan kid#1 birthday gift and Easter gift
-buy a car (not nearly as fun as it sounds)
I was able to use some of my Grandma & Great-Grandma's buttons to finish it and I love how it turned out! Sorry, kid #1, your mom put off knitting for so long you'll never be able to wear this.
I still hadn't scratched the knitting itch completely, so I whipped up a hat (Little Fair Isle Hat) for my sister's baby. Then I whipped up an identical hat for my baby. I am in love with the little loop at the top and think all my hats for kids will end up with a loop instead of a pompom for awhile.
After that, I knocked out a quick pair of baby socks following this pattern, Garter Stripe Baby Socks.
Now the knitting itch has been satisfied and I can work on some other projects for awhile.
It's a good thing, too, as I'm officially 9 months pregnant and have quite a to-do list before this second kiddo is born. Namely:
-get out and wash newborn attire and diapers
-pick out an announcement
-install the carseat
-preregister at the hospital
-print birth plan
-practice hypnobirthing
-make kid#1 busy bags
-make a million freezer meals
-stockpile necessities (food, toiletries, paper products)
-buy a few things (like a double stroller and new diaper covers)
-plan kid#1 birthday gift and Easter gift
-buy a car (not nearly as fun as it sounds)
Thursday, January 28, 2016
Tutus or Bowties
I helped host my sister's baby shower recently, and I was in charge of games. I did a "tutus or bowties" game where everyone chose to wear either a bow tie or a tutu on their shirt indicating what gender they predicted the baby will be. We were initially expecting about 50 guests at the shower, so I needed to make quite a few ties and tutus.
I started by ordering bow tie and onesie shaped cardstock pieces from THIS etsy shop. I don't think I could have cut them all out by hand and kept my sanity. If you have a silhouette you have this part easy. I found some adorable trim at Joanne Fabrics and got a yard (I found similar stuff at Hobby Lobby as well) which made the skirts for about 20 of them. I also found a roll of tulle on clearance and thought it would work well for the other half of the tutus.
The trim I just cut and hot glued around the back of the tutu. The tulle was much more putzy to work with and took FOR.EV.ER for each tutu. I cut a length about three times the width of the onesie, and folded the tulle in half lengthwise. Then I pleated it and hot glued it all along the front of the onesie. You'll want to use a skewer or point of scissors or something to hold it in place while the hot glue dries. I did not. Instead, I used my fingernails and lived dangerously. Although I do always take Martha's advice and have a cup of water nearby when I'm hot gluing so that I can stick my finger in it when I am inevitably burned.
Then I used a small piece of shimmery gold washi tape (from Walmart) to cover the waistband of the tutu.
I wasn't as happy with the tulle-skirted tutus, perhaps if I hadn't gotten cheap plasticy tulle it would have gone better. But I made 20 of these suckers so there was no turning back.
Then, I just used some sharpies to spice up the plain bow ties.
I bought a couple of packages of closable pins and a dollop of hot-glue secured one to the back of each tutu and tie.
All in all, this was a cute little activity to have everyone predict baby's gender. A very low-key shower activity!
Many of the pins were returned to me, so if anyone is interested in the leftover bow tie or tutu pins, just say the word. They're yours if you want!
![]() |
| These lovely ladies chose to wear bow ties! |
I started by ordering bow tie and onesie shaped cardstock pieces from THIS etsy shop. I don't think I could have cut them all out by hand and kept my sanity. If you have a silhouette you have this part easy. I found some adorable trim at Joanne Fabrics and got a yard (I found similar stuff at Hobby Lobby as well) which made the skirts for about 20 of them. I also found a roll of tulle on clearance and thought it would work well for the other half of the tutus.
![]() |
| Trim that worked beautifully |
The trim I just cut and hot glued around the back of the tutu. The tulle was much more putzy to work with and took FOR.EV.ER for each tutu. I cut a length about three times the width of the onesie, and folded the tulle in half lengthwise. Then I pleated it and hot glued it all along the front of the onesie. You'll want to use a skewer or point of scissors or something to hold it in place while the hot glue dries. I did not. Instead, I used my fingernails and lived dangerously. Although I do always take Martha's advice and have a cup of water nearby when I'm hot gluing so that I can stick my finger in it when I am inevitably burned.
![]() |
| Pleated, folded lengthwise tulle, mid-hot-gluing |
Then I used a small piece of shimmery gold washi tape (from Walmart) to cover the waistband of the tutu.
I wasn't as happy with the tulle-skirted tutus, perhaps if I hadn't gotten cheap plasticy tulle it would have gone better. But I made 20 of these suckers so there was no turning back.
Then, I just used some sharpies to spice up the plain bow ties.
I bought a couple of packages of closable pins and a dollop of hot-glue secured one to the back of each tutu and tie.
All in all, this was a cute little activity to have everyone predict baby's gender. A very low-key shower activity!
Many of the pins were returned to me, so if anyone is interested in the leftover bow tie or tutu pins, just say the word. They're yours if you want!
Thursday, January 14, 2016
A Quick Knit
My son was in need of a hat. His adorable one (made by the ohsotalented Jamie) disappeared. After he pulled the pom pom on the top apart while in his carseat. With the super frigid weather this past week, I decided that the reasonable thing to do would not be to purchase a hat...oh no...I needed to knit one. So I used some yarn that the ohsogenerous Jamie sent me and cast on the Adelisa Earflap hat. It was a quick and satisfying knit (actually I enjoyed it so much I'm thinking about what other semi-mindless colorwork project I need in my life now). And it fits reasonably! I'm terrible at checking my gauge so it's always a gamble when I knit. It's much better than wearing Daddy's hat around town (sorry I blamed that on you, kiddo).
That's it! Shortest blog post ever!
![]() |
| Look at that modeling! And I only had to bribe him with water in his new cup! |
That's it! Shortest blog post ever!
Monday, December 21, 2015
A Toddler Nativity
I have been looking for a super kid-friendly nativity set that can be played with by my 1 1/2 year old. I had looked at this wooden one and several stuffed sewn options, but didn't find one that fit into my very limited price range and my aesthetic requirements.
I was wandering through Hobby Lobby (as much wandering as can be done with a toddler kicking me and the cart) and spotted this felt sticker nativity set on sale for about $3. That fit in the budget!
I also picked up a large piece of brown felt; folded in half and cut, it makes a great stable.
I wanted to make this somewhat interactive, yet not so much fun that poor baby Jesus will end up under the couch like so many other toys. So I settled on buttons and ribbon loops so that we can hang each character up in the stable together and then hopefully he'll leave them alone.
I auditioned the placement of each button and added a few extra buttons so that my son can be creative about where he puts each one. I sewed on buttons to the stable as securely as possible, and then cut ribbons and hot glued a piece to each piece. I just left the back of the sticker in place since we won't be sticking them to anything.
It's true that this would be more fun with some animals or shephards or things, maybe next year. I packaged each part up (angel, Mary & Joseph, the star & the wise men, Jesus) separately and am having him open each one up on a different day like a mini Advent calendar. Then I plan on talking a bit or doing a little activity about each one. He's only a year and a half old, so I think only a few days worth of activities and advent calendar is enough.
I taped it up to the back side of our door with a lot of washi tape. If that isn't secure enough I'll use our bulletin board and lots of staples.
So far it's a big hit!
I was wandering through Hobby Lobby (as much wandering as can be done with a toddler kicking me and the cart) and spotted this felt sticker nativity set on sale for about $3. That fit in the budget!
I also picked up a large piece of brown felt; folded in half and cut, it makes a great stable.
I wanted to make this somewhat interactive, yet not so much fun that poor baby Jesus will end up under the couch like so many other toys. So I settled on buttons and ribbon loops so that we can hang each character up in the stable together and then hopefully he'll leave them alone.
I auditioned the placement of each button and added a few extra buttons so that my son can be creative about where he puts each one. I sewed on buttons to the stable as securely as possible, and then cut ribbons and hot glued a piece to each piece. I just left the back of the sticker in place since we won't be sticking them to anything.
It's true that this would be more fun with some animals or shephards or things, maybe next year. I packaged each part up (angel, Mary & Joseph, the star & the wise men, Jesus) separately and am having him open each one up on a different day like a mini Advent calendar. Then I plan on talking a bit or doing a little activity about each one. He's only a year and a half old, so I think only a few days worth of activities and advent calendar is enough.
I taped it up to the back side of our door with a lot of washi tape. If that isn't secure enough I'll use our bulletin board and lots of staples.
So far it's a big hit!
Wednesday, December 16, 2015
A Very Scandinavian Christmas
I have been working to decorate our house for Christmas a little bit every day this year, while simultaneously preparing for my sister's baby shower and a week at my mom's house. Busy Busy!
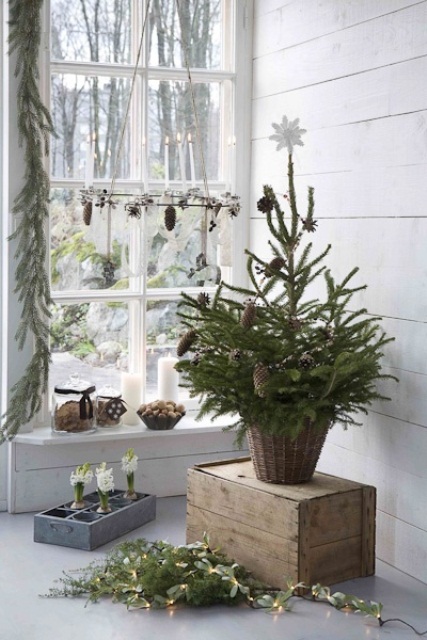
I've always loved Scandinavian decor- so much white and bright and cozy and minimal- and thought I'd see what Scandinavian christmas decor I could find on Pinterest. Lo and behold, I've already got Scandinavian Christmas decorations all over the place! Here's what I found:
Natural branch stars:
![]() |
| Theirs: Wabi Sabi |
![]() |
| Mine: wrapped in fluffy white yarn |
Swagged/Pom pom garland:
![]() |
| Theirs: my Scandinavian Home |
![]() |
| Mine: Pom poms and felt circles leftover from last year |
Branches in jars:
![]() |
| Theirs: Christmas Ideas with Scandinavian Flair |
![]() |
| Mine |
Small Christmas Trees:
![]() |
| Theirs: www.digsdigs.com |
![]() |
| Mine: Short tree on a box |
Subscribe to:
Posts (Atom)